

Headlines News
Home
Headlines Sample Application
Introduction to Headlines
Headlines is an expample project that shows hwo the release (build, deployment, and startup) process for Headlines News, a simple Linux/Apache/Mysql/Tomcat (LAMT) based application, is automated using ControlTier 3. It is a single node demo and assumes that ControlTier Server, Client, and the Headlines News componendts (Apache, Mysql, and Tomcat) will be installed on the same node.
Installing Headlines
How does it work?
Learn more about ControlTier and how to use it in the documentation section.
Join our mailing lists.
Download the software and try it out.
Try the short ProjectBuilder Tutorial to experience what its like to create automation with ControlTier.
Contact the services arm of ControlTier for a free assessment of how our open source tools and/or our services can benefit your organization.
Download
Getting Headlines
Module Library
The 0.9 release of the elements module library is available at ModuleForge.
Headlines zip
The Headlines zip file is available at ModuleForge
Elements seed Java archive
The Elements seed Java archive version 0.9 is availabel at ModuleForge
Headlines project archive
The Headlines project archive file version 0.9 is available at ModuleForge.
Installation
Preparation
Overview
Instructions
- This demonstration application has been tested using a Bash shell on Linux (Redhat Enterprise Linux 4 or similar) with ControlTier 3.1.
- It is assumed that ControlTier 3.1 has been successfully installed using the self-contained directory convention for which this is the recommended default properties file:
NoteIf you would like to install ControlTier elsewhere than the default location, change instances of "${user.home}/ctier" to the directory of your choice in your default.properties file.
############### # # default.properties # ############### # # This file contains the install properties for ControlTier # Server and Client. # ############### ############### # Tomcat ############### # the value of CATALINA_BASE (e.g. /usr/local/tomcat) env.catalina_base = ${user.home}/ctier/workbench # the value of CATALINA_HOME (e.g. /usr/local/tomcat) env.catalina_home = ${user.home}/ctier/pkgs/apache-tomcat-4.1.36 # the listen port used by Tomcat (Tomcat default is 8080) server.tomcat.port = 8080 # the hostname used by tomcat server.tomcat.hostname = localhost # the application context path for the webdav app server.tomcat.webdav.path = webdav # the listen port used by the Report server. (Default is 1055) server.reports.port = 1055 # Should the installer replace the Xerces jars included with Tomcat # with newer versions required by ControlTier Server? # If you choose not to, ControlTier Server will not function. # See: http://open.controltier.com/Docs/tomcat41-filesonly.html#Update+Tomcat+Libraries tomcat.replace-xerces-jars = true ################ # User access # # Tomcat uses the "tomcat-users.xml" file to define users, passwords and roles. # # ControlTier Server and Client require that the users with access to # the server belong to certain named "roles" that are not present in the # default Tomcat installation. # # If you want the installer to provide a new ControlTier ready # tomcat-users.xml file for you (and backup your existing file), set the # following property to be "true". It is RECOMMENDED that you set this # to "true" unless you have modified the tomcat-users.xml file yourself. users.install-default = true # If you choose to maintain your old tomcat-users.xml file, then be sure that # the user named below belongs to these roles: "user,admin". # See: http://open.controltier.com/Docs/tomcat41-filesonly.html#Configure+Tomcat+Realm ################ # the name of the default ControlTier user tomcat.user.name = default # the password of the default ControlTier user tomcat.user.password = default ################ # ControlTier Server ################ #If the following directories don't exist, the installer will create them # RDF datastore path server.rdfdata.path = ${env.catalina_base}/rdfdata server.dav.basedir = ${env.catalina_base}/webapps/webdav ################ # ControlTier Client ################ # Base install of AntDepo, ANTDEPO_BASE. (e.g.: $HOME/antdepo_base) env.antdepo_base = ${user.home}/ctier/antdepo # Location of AntDepo home, ANTDEPO_HOME. (e.g.: $HOME/antdepo-version) env.antdepo_home = ${user.home}/ctier/pkgs/antdepo-1.3 # Hostname used by the ControlTier client. This is the # name that will appear in Workbench. ${server.tomcat.hostname} sets this # value to the hostname specified in the Tomcat section above. client.hostname = ${server.tomcat.hostname} ################ # Client email settings ################ # recipient addresses to send email (comma separated) framework.email.tolist = root # email address appearing in message "from" field framework.email.from = root # email address replies should go to framework.email.replyto = do-not-reply # The antdepo email relay host. must be a functioning smtp relay server framework.email.mailhost = mail framework.email.mailport = 25 # User/pass info if the smtp server requires it framework.email.user = framework.email.password = framework.email.ssl = true # Fail if there is an error framework.email.failonerror = true ################ # Client SSH settings ################ # Path to the SSH private key framework.ssh.keypath = ${user.home}/.ssh/id_rsa - The default object definitions distributed with the demonstration assume the existence of the CTIER_ROOT environment variable. Add the variable to "~/.ctierrc" setting it to wherever you decided to install ControlTier (e.g. "export CTIER_ROOT=~/ctier").
- Make sure that your version of Ant is 1.7.0
Next step ...
Choose an installation track by selecting source, seed or project archive ...
Installing from source
Overview
Instructions
- Follow the general instructions to prepare for installation from source.
- Check out the 0.9 release of the elements module library from ModuleForge into the source directory under CTIER_ROOT. For example:
$ svn co https://moduleforge.svn.sourceforge.net/svnroot/moduleforge/tags/elements/0.9 ~/ctier/src/elements
.
.
.
Checked out revision 133.
- Add a new project (example: headlines) to Workbench or choose an existing project.
- Create the Antdepo depot for the project (if necessary). Example:
$ depot-setup -p headlines -a create
.
.
.
Calling Get-Properties from the Managed-Entity module for node: localhost
- Create a ProjectBuilder object to manage packaging the Elements library's modules. For example:
$ ad -p headlines -t ProjectBuilder -o elements -c Register -- -basedir ${CTIER_ROOT}/src/elements/modules -installroot ${CTIER_ROOT}/src/elements -install -description "Elements module library builder" . . . For more information about this object run: ad -p headlines -t ProjectBuilder -o elements -c Get-Properties -- -print [command.timer.Deployment.Register: 5.012 sec] - Build the Elements module library from source.
$ ad -p headlines -t ProjectBuilder -o elements -c build-library -- -name elements
.
.
.
Building jar: ~/ctier/src/elements/elements-seed.jar
[command.timer.build-library: 10.253 sec]
-
Run the Ant build file from the Headlines demonstration source directory to setup the installed files and directories:
NoteIt is possible to override the "ctier_root" property on the Ant build command line to provide a value other than the default of the CTIER_ROOT environment variable. This is useful for creating a minimal "skeleton" hierarchy suitable for release using the "package" target.
$ pwd ~/ctier/src/elements/demo/headlines $ ant dist Buildfile: build.xml dist: [echo] Installing headlines directories and files into "~/ctier" ... [copy] Copying 1 file to ~/ctier/demo/headlines/data [copy] Copying 1 file to ~/ctier/demo/headlines/objects [copy] Copying 48 files to ~/ctier/demo/headlines/cvs BUILD SUCCESSFUL Total time: 0 seconds - Load the seed jar using ProjectBuilder by giving the following command:
NoteYou must give the full path to the file elements-seed.jar.
ad -p headlines -t ProjectBuilder -o elements -c load-library -- -jar elements-seed.jar
-
Populate the project with the Headlines demonstration's sample objects using the provided Project XML file. For example:
$ ad -p headlines -t ProjectBuilder -o elements -c load-objects -- -format projectxml -filename $CTIER_ROOT/demo/headlines/objects/project.xml
.
.
.
Executing batch update ...
[command.timer.load-objects: 10.715 sec]
Next step ...
- You are now ready for the Tutorial.
Installing from module seed file
Overview
Instructions
- Follow the general instructions to prepare for installation from seed.
- Add a new project (example: headlines) to Workbench or choose an existing project.
- Create the Antdepo depot for the project (if necessary). Example:
$ depot-setup -p headlines -a create
.
.
.
Calling Get-Properties from the Managed-Entity module for node: localhost
- Create a ProjectBuilder object to manage packaging the libraries module. For example:
$ ad -p headlines -t ProjectBuilder -o elements -c Register -- -basedir ${CTIER_ROOT}/src/elements/modules -installroot ${CTIER_ROOT}/src/elements -install -description "Elements module library builder" . . . For more information about this object run: ad -p headlines -t ProjectBuilder -o elements -c Get-Properties -- -print [command.timer.Deployment.Register: 5.814 sec] - Download version 0.9 of the Headlines Zip file from ModuleForge and unpack it into your CTIER_ROOT.
- Download version 0.9 of the Elements seed Java archive from ModuleForge.
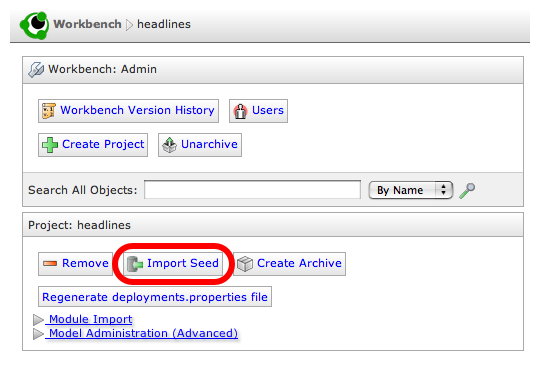
-
Whether downloaded or built from source, use the "Import Seed" option from the Workbench administration page to upload the seed file to your project.
-
Populate the project with the Headlines demonstration's sample objects using the provided Project XML file. For example:
$ ad -p headlines -t ProjectBuilder -o elements -c load-objects -- -format projectxml -filename $CTIER_ROOT/demo/headlines/objects/project.xml
.
.
.
Executing batch update ...
[command.timer.load-objects: 10.715 sec]
Next step ...
- You are now ready for the Tutorial.
Installing from project archive file
Overview
Instructions
- Follow the general instructions to prepare for installation from project archive file.
-
Download version 0.9 of the Headlines project archive.
-
In Workbench unarchive the project archive file.
-
At the command line, run AntDepo's depot-setup command to register your node with the headlines project in Workbench. The -a flag defines the action for the depot-steup command (in this case, create).
$ depot-setup -p headlines -a create
.
.
.
Calling Get-Properties from the Managed-Entity module for node: localhost
-
Download version 0.9 of the Headlines Zip file from ModuleForge and unpack it into your CTIER_ROOT.
Next step ...
- You are now ready for the Tutorial.
Tutorial
Headlines Release Management System
Release Management System Overview
The Headlines release management system supports the application release and deployment activity for the Headlines-News Services online application.
Scope
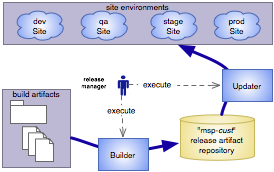
The scope of the system's responsibility is to coordinate the build process with the deployment process. The figure below also shows the system provides a repository wherein release artifacts, as well as, deployment configuration models are stored.

Use
The release management system is shared by the release manager and developers to define the release deployment process, and model the deployment configurations of the organization's online application systems. From these process and model definitions, the system generates a set of control modules that can be executed to perform the release and lifeycle management procedures. Users execute the procedures to build releaese artifacts, populate the repository and update sites containing their application deployments.
Methodology
The release management system reflects a standard methodology for developing automated processes that drive the application release and deployment life cycle. The methodology is oriented around the basic concepts of builders, repository, updaters and sites. Therefore, it is typical that work begins with the definition of builders and release artifacts and precedes to the definition of updaters and sites.
Manual Contents
This manual describes the system used to release and maintain the Headlines application in the various operational environments.
Please follow the track which best suits your needs. The manual is divided into the following subject areas:
- Procedures: The procedures section describes the routine processes performed by the release manager.
- Administration: The administration section provides information to the system administrator responsible for maintaining the release management system.
- Development: The development section provides information to the automation engineer responsible for developing and maintaining the automation modules.
Procedures
Procedures
Overview
This section of the manual describes the various routine processes used to build and release the Headlines applications. Release management process is organized around a set of life cycle procedures as shown in the figure below.
The bulk of this manual section is devoted to describing the procedures to carry out the various routine release processes. Procedures are organized into several groups in the side bar.
Standardized Process
The procedures used to make releases to applications in the operational environments have been standardized around several basic concepts. The figure below describes the standard workflow for building and deploying releases to the application deployments.

The table below describes the role of each of these core concepts:
| Concept | Role |
|---|---|
| Builder | A builder is responsible for interfacing with the software build tool (e.g., Ant), configuring and executing the build, and then loading configured build artifacts into the repository. |
| Repository | A store house containing deployment models (i.e, objects) and build artifacts (i.e., packages). |
| Updater | An Updater is responsible for interfacing with an application system (i.e, a site), configuring the package dependencies within the site and coordinating the installation, reconfiguraiton and restart of the deployment processes. |
| Site | A collection of deployments structured by their configurations comprising an integrated software system. A site also provides a centralized point of management, as well as, exposing useful service-specific operations used by Updaters. |
Each of these concepts is exposed as a component in the system, allowing the release manager to use a standard interface for managing the process and the resources used by the process.
Modules
Procedures are exposed via AntDepo automation modules. These modules are defined and maintained using the ControlTier Workbench application and executed as AntDepo commands. The release manager can choose from the commands of these modules to perform all or subsets of the release management processes.
Refer to the specific documentation for each category of module: Builder, Updater, Site.
Putting it all together
- The following software packages must be downloaded and unpacked in the ${CTIER_ROOT}/demo/headlines/pkgs directory. MySql 5.0.41, Apache 2.2.4, tomcat-connector-1.2.23. jdk1.5.0_11, and ant-1.7.0.
-
Since Apache 2.2.4 is downloaded in source format, it is necessary to build it. Please follow the steps given below:
$ tar xvfz httpd-2.2.4.tar.gz
.
.
.
$ cd httpd-2.2.4
./configure --prefix=$(pwd)
.
.
.
config.status: executing default commands

$ make
.
.
.
make[1]: Leaving directory `/home/headlines/ctier/demo/headlines/pkgs/httpd-2.2.4'

$ make install
.
.
.
make[1]: Leaving directory `/home/headlines/ctier/demo/headlines/pkgs/httpd-2.2.4'
-
The next step is to unpack Mysql
 tar xvfz mysql-5.0.41-linux-i686.tar.gz
.
.
.
mysql-5.0.41-linux-i686/COPYING
-
Unpack Java
 sh jdk-1_5_0_11-linux-i586.bin
.
.
.
Creating jdk1.5.0_11/jre/lib/deploy.jar
Done.
-
Unpack the apache-ant-1.7.0
unzip apache-ant-1.7.0-bin.zip
.
.
.
inflating: apache-ant-1.7.0/lib/xml-apis.jar
-
Unpack the tomcat-connectors-1.2.23
tar xvfz tomcat-connectors-1.2.23-src.tar.gz
.
.
.
tomcat-connectors-1.2.23-src/conf/workers.properties.minimal
-
We need to download and build the JK module to interface Tomcat and Apache servers. Once you have downloaded and unpacked the tomcat-connector package, please follow the steps given below:
$ export JAVA_HOME=${CTIER_ROOT}/demo/headlines/pkgs/jdk1.5.0_11 $ cd ${CTIER_ROOT}/demo/headlines/pkgs/tomcat-connectors-1.2.23-src/native $./configure --with-apxs=${CTIER_ROOT}/demo/headlines/pkgs/httpd-2.2.4/bin/apxs --prefix=$(pwd) . . . config.status: executing depfiles commands $ make . . . make[1]: Leaving directory `/home/headlines/ctier/demo/headlines/pkgs/tomcat-connectors-1.2.23-src/native/apache-2.0' $ make install . . . make[1]: Leaving directory `/home/headlines/ctier/demo/headlines/pkgs/tomcat-connectors-1.2.23-src/native' -
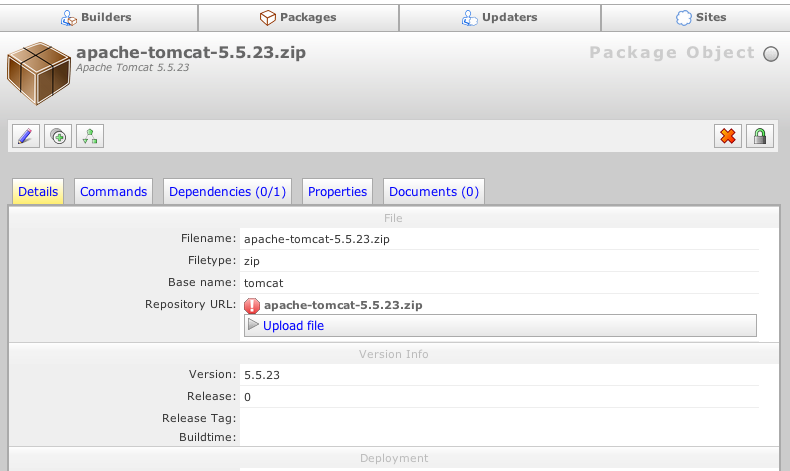
Download Tomcat 5.5.23 to your computer and upload the file using Workbench as
shown in the figure below:
- The next step is to synchornize the local AntDepo repository to the specification set in Workbench. The depot-setup usage shown below will download the objects and their modules to the local repository.
depot-setup -p headlines -a deploy
.
.
.
Install command running for object: (Tomcat) headlines
Install command running for object: (WarUpdater) headlines
Install command running for object: (AntBuilder) headlines
Install command running for object: (Site) headlines
Install command running for object: (Apache) headlines
Install command running for object: (MysqlRdb) headlines
Install command running for object: (ProjectBuilder) elements
-
The Prepare workflow is only executed any time the non-application packages are required to be installed and configured. Run the Prepare workflow immideately after installation to get the platform in desired state.
Run the Prepare workflow to get the platform in the desired state:ad -p headlines -t WarUpdater -o headlines -c Prepare . . . [command.timer.Deployment.Configure: 2.903 sec] -
Copy the catalina-ant.jar to the apache-ant as shown below.
pwd /ctier/demo/headlines/pkgs cp apache-tomcat-5.5.23/server/lib/catalina-ant.jar apache-ant-1.7.0/lib -
The application package is built and deployed much more frequently. This can be achived by running the following single command:
ad -p headlines -t WarUpdater -o headlines -c BuildAndUpdate -- -buildstamp 200709040900
.
.
.
[command.timer.Service.Start: 3.826 sec]
[command.timer.Service.Update: 20.083 sec]
[command.timer.Updater.updateSites: 2:55.528 sec]
[command.timer: 44.640 sec]
-
The application package can also be built and deployed in seperate steps.:
- Build the application and publish the release artifacts to the repository:
ad -p headlines -t AntBuilder -o headlines -c Build -- -buildstamp 200709040900
.
.
.
Batch request performed successfully.
Current count: 1
[command.timer.Builder.repoImport: 16.382 sec]
[command.timer: 37.230 sec]
- Reconfigure the headlines site in staging to use packages from the last build:
ad -p headlines -t WarUpdater -o headlines -c Change-Dependencies -- -version 200709040900
.
.
.
Request succeeded.
[command.timer.Updater.runChangeDependencies: 4.300 sec]
[command.timer: 8.764 sec]
- Deploy the release to the live site:
ad -p headlines -t WarUpdater -o headlines -c Update
.
.
.
[command.timer.Service.Start: 4.593 sec]
[command.timer.Service.Update: 22.917 sec]
[command.timer.Updater.updateSites: 2:38.813 sec]
[command.timer: 2:42.604 sec]
- Build the application and publish the release artifacts to the repository:
-
To check whether the Apache server is working properly or not, go to the following URL: http://localhost:8180/headlines/index.html
To check whether the Tomcat server is working properly or not, go to the following URL: http://localhost:8280/headlines/index.html
NoteIt is assumed that Headlines has been deployed to the local machine, hence "localhost". If this is not the case, use your machine's fully qualified domain name, or IP address instead of localhost.
The benefit of the standardized process is that an organization can use the same procedure and automation code to drive the release cycle in different environments. This reduces complexity from the operational process and facilitates transitioning involved multi-step procedures to less knowledgeable staff.
Next: See the getting around section for information about using the tools within the release management system.
Getting Around
Overview
This section describes the environments and tools used to carry out the routine procedures using the release management system.
Tools
The release management system is built using the open source ControlTier platform.
A ControlTier project named, headlines, should be used to manage the automation and release artifacts for the Headlines-News Services application.
ControlTier Server (Repository and Workbench)
The ControlTier server maintains a repository of release artifacts and management automation modules. The web-based application, Workbench, provides a graphical interface to defining the deployment and control model for the Headlines applications.
At this time, a single project named, headlines, defines the repository for the Headlines environments and release processes.
ControlTier Agent (Execute Commands)
The release manager uses the ControlTier agent to perform the release process. The ControlTier agent uses the AntDepo framework to execute these procedures as AntDepo commands.
After logging into a machine, the ad command can be run without arguments to see what projects and objects are available to manage.
The example below shows successive invocations of the ad commands showing how to use ad to query the local repository.
	  $ ad
	  #Available projects :
	  headlines

	  $ ad -p headlines
	  #Available types in project:
	  AntBuilder
	  Apache
	  JakartaTomcat
          MysqlRdb
          MysqlSchema
          Node
          ProjectBuilder
          Site
          WarUpdater

	  $ ad -p headlines -t Site
	  #Available instances:
	  headlines

	  $ ad -p headlines -t Site -o headlines
	  #Available commands
	  Start
	  Status
	  Stop
	  ...
This last invocation of ad shows the commands available for the specified object.
Running Commands
Commands can be executed by specifying the -c command argument and providing a command name as a parameter.
$ ad -p headlines -t Apache -o headlines -c Status
running assertServiceIsUp command
Apache web service is up.
[command.timer.Service.Status: 3.581 sec]
The Status command ran and completed successfully.
[ $? -eq 0 ] && echo success => success
The following example shows a Stop command.
$ ad -p headlines -t Apache -o headlines -c Stop
running command: assertServiceIsDown
Running handler command: stopService
Apache service stopped.
[command.timer.Service.Stop: 4.758 sec]
This output shows the Stop command is actually a workflow type command which runs the assertServiceIsDown command. The assertServiceIsDown command will return true if the apache instance is not running. If it fails, that means the apache instance is running, and the workflow error handler runs the stopService command.
Finally, the Start command is used to bring up the Apache instance:
$ ad -p headlines -t Apache -o headlines -c Start
running command: assertServiceIsUp
Running handler command: startService
Apache service started.
[command.timer.Service.Start: 4.446 sec]
Similar to the Stop command, the Start command is also a command workflow. It first runs the upService command and if that fails, the workflow error handler runs the startService command.
These examples have shown commands which complete successfully. To contrast those with one that shows the output of a failure, the next example demonstrates a failed command.
The last command started apache successfully, that means if the assertServiceIsDown command is run now, it should fail:
$ ad -p headlines -t Apache -o headlines -c assertServiceIsDown
Command failed.
ctier/antdepo/depots/headlines/lib/ant/modules/Apache/commands/assertServiceIsDown.xml:22: Apache web service is Up.

error: Apache web service is Up.
The output of the command shows that the assertServiceIsDown command finds the Apache server is running and therefore fails.
[ $? -eq 0 ] || echo failed => failed
Refer to the base-type documentation which discusses the routine procedures of building, updating, and operating the Headlines application sites.
Administration
Administration
Overview
This section will contain information describing object model maintainance and Headlines release management specific administration of the ControlTier framework.
Development
Development
Overview
This section provides a reference for how to enhance the Headlines release management system. It is intended for developers interested in evolving the model and or automation modules.
Working with Types
You can create, edit, and delete Types using the Type Editor in Workbench. Please refer to the Type documentation for further information.
Working with Updaters
To learn more on how to work with Updaters, refer to the Updater documentation.
Working with Service
To learn more on how to work with the Base Type Service, refer to the Service documentation.
Model
Overview
This document provides an overview of the ControlTier model design used by the Headlines release management system.
Schema
The model schema is based on a type hierarchy and property constraints.
Compositional Structure
The Acme Headlines model uses a standard component hierarchy. The model is layered in roughly three levels.
- Mediators: Provide centralized control points for coordinating actions to model sub hierarchies.
- Services: Represent deployments with runtime state.
- Packages: Represent release artifacts that must be deployed to application components.
The remainder of this document provides detail for the primary domains of the model.
Tomcat Types
Tomcat servers are represented as Services. For each kind of named server, a specific subtype is defined.
| Name | Description |
|---|---|
| JakartaTomcat | Subtype of Service, used to control the lifecycle of an Tomcat server. |
Package Types
Packages represent release artifacts that are deployed to application components. They are all derived from base types provided by the ControlTier Workbench. The Package base type establishes a common protocol for all package sub-types. The Package type is discussed in more detail here.
Rdb Types
An Rdb type represents a database instance. Rdb instances are composed of RdbSchemas, which in turn are composed of login credentials and optionally database import files.
| Name | Description |
|---|---|
| RdbSchema | Subtype of Deployment, used to manage a database schema. |
| MysqlRdbSchema | Subtype of RdbSchema, used to manage a mysql database schema. |
Help
Getting Help with ControlTier
How to get help
ControlTier is a community effort supported by a professional development and services company. When it comes to our tools, there is no dual licensing or tiered citizens, everything is free and open source.
If you need help or want to provide feedback, you can either post to our mailing lists or contact our professional services group. ControlTier Inc. has a wide rage of automation expertise that goes beyond the ControlTier platform.
Mailing lists
Please join these mailing lists and discussion groups to participate in the ControlTier community.
ControlTier (controltier@googlegroups.com)
Join the ControlTier list to ask questions, discuss issues of interest to ControlTier users, or get involved with ControlTier development. This discussion group is hosted by Google Groups.
ControlTier Code Commit (controltier-codecommit@googlegroups.com)
Join the ControlTier Code Commit list to be informed of the latest source code check-ins for the ControlTier project. This discussion group is hosted by Google Groups.