


Procedures
Overview
This section of the manual describes the various routine processes used to build and release the Headlines applications. Release management process is organized around a set of life cycle procedures as shown in the figure below.
The bulk of this manual section is devoted to describing the procedures to carry out the various routine release processes. Procedures are organized into several groups in the side bar.
Standardized Process
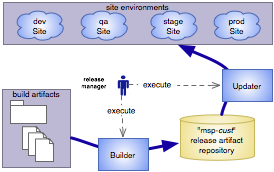
The procedures used to make releases to applications in the operational environments have been standardized around several basic concepts. The figure below describes the standard workflow for building and deploying releases to the application deployments.

The table below describes the role of each of these core concepts:
| Concept | Role |
|---|---|
| Builder | A builder is responsible for interfacing with the software build tool (e.g., Ant), configuring and executing the build, and then loading configured build artifacts into the repository. |
| Repository | A store house containing deployment models (i.e, objects) and build artifacts (i.e., packages). |
| Updater | An Updater is responsible for interfacing with an application system (i.e, a site), configuring the package dependencies within the site and coordinating the installation, reconfiguraiton and restart of the deployment processes. |
| Site | A collection of deployments structured by their configurations comprising an integrated software system. A site also provides a centralized point of management, as well as, exposing useful service-specific operations used by Updaters. |
Each of these concepts is exposed as a component in the system, allowing the release manager to use a standard interface for managing the process and the resources used by the process.
Modules
Procedures are exposed via AntDepo automation modules. These modules are defined and maintained using the ControlTier Workbench application and executed as AntDepo commands. The release manager can choose from the commands of these modules to perform all or subsets of the release management processes.
Refer to the specific documentation for each category of module: Builder, Updater, Site.
Putting it all together
- The following software packages must be downloaded and unpacked in the ${CTIER_ROOT}/demo/headlines/pkgs directory. MySql 5.0.41, Apache 2.2.4, tomcat-connector-1.2.23. jdk1.5.0_11, and ant-1.7.0.
-
Since Apache 2.2.4 is downloaded in source format, it is necessary to build it. Please follow the steps given below:
$ tar xvfz httpd-2.2.4.tar.gz
.
.
.
$ cd httpd-2.2.4
./configure --prefix=$(pwd)
.
.
.
config.status: executing default commands

$ make
.
.
.
make[1]: Leaving directory `/home/headlines/ctier/demo/headlines/pkgs/httpd-2.2.4'

$ make install
.
.
.
make[1]: Leaving directory `/home/headlines/ctier/demo/headlines/pkgs/httpd-2.2.4'
-
The next step is to unpack Mysql
 tar xvfz mysql-5.0.41-linux-i686.tar.gz
.
.
.
mysql-5.0.41-linux-i686/COPYING
-
Unpack Java
 sh jdk-1_5_0_11-linux-i586.bin
.
.
.
Creating jdk1.5.0_11/jre/lib/deploy.jar
Done.
-
Unpack the apache-ant-1.7.0
unzip apache-ant-1.7.0-bin.zip
.
.
.
inflating: apache-ant-1.7.0/lib/xml-apis.jar
-
Unpack the tomcat-connectors-1.2.23
tar xvfz tomcat-connectors-1.2.23-src.tar.gz
.
.
.
tomcat-connectors-1.2.23-src/conf/workers.properties.minimal
-
We need to download and build the JK module to interface Tomcat and Apache servers. Once you have downloaded and unpacked the tomcat-connector package, please follow the steps given below:
$ export JAVA_HOME=${CTIER_ROOT}/demo/headlines/pkgs/jdk1.5.0_11 $ cd ${CTIER_ROOT}/demo/headlines/pkgs/tomcat-connectors-1.2.23-src/native $./configure --with-apxs=${CTIER_ROOT}/demo/headlines/pkgs/httpd-2.2.4/bin/apxs --prefix=$(pwd) . . . config.status: executing depfiles commands $ make . . . make[1]: Leaving directory `/home/headlines/ctier/demo/headlines/pkgs/tomcat-connectors-1.2.23-src/native/apache-2.0' $ make install . . . make[1]: Leaving directory `/home/headlines/ctier/demo/headlines/pkgs/tomcat-connectors-1.2.23-src/native' -
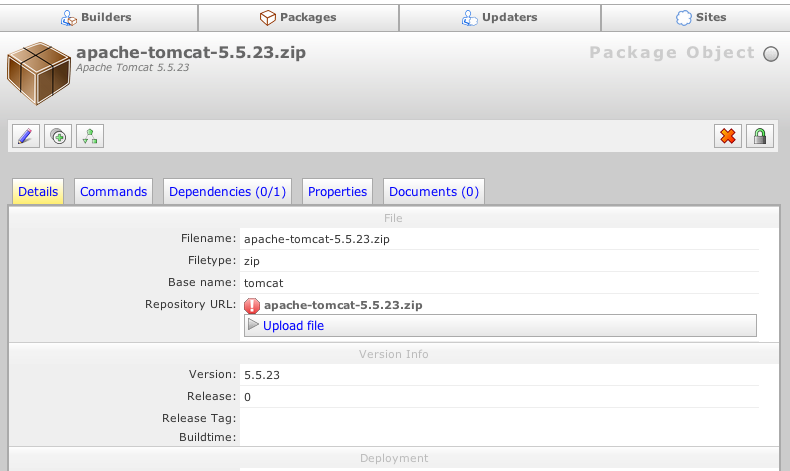
Download Tomcat 5.5.23 to your computer and upload the file using Workbench as
shown in the figure below:
- The next step is to synchornize the local AntDepo repository to the specification set in Workbench. The depot-setup usage shown below will download the objects and their modules to the local repository.
depot-setup -p headlines -a deploy
.
.
.
Install command running for object: (Tomcat) headlines
Install command running for object: (WarUpdater) headlines
Install command running for object: (AntBuilder) headlines
Install command running for object: (Site) headlines
Install command running for object: (Apache) headlines
Install command running for object: (MysqlRdb) headlines
Install command running for object: (ProjectBuilder) elements
-
The Prepare workflow is only executed any time the non-application packages are required to be installed and configured. Run the Prepare workflow immideately after installation to get the platform in desired state.
Run the Prepare workflow to get the platform in the desired state:ad -p headlines -t WarUpdater -o headlines -c Prepare . . . [command.timer.Deployment.Configure: 2.903 sec] -
Copy the catalina-ant.jar to the apache-ant as shown below.
pwd /ctier/demo/headlines/pkgs cp apache-tomcat-5.5.23/server/lib/catalina-ant.jar apache-ant-1.7.0/lib -
The application package is built and deployed much more frequently. This can be achived by running the following single command:
ad -p headlines -t WarUpdater -o headlines -c BuildAndUpdate -- -buildstamp 200709040900
.
.
.
[command.timer.Service.Start: 3.826 sec]
[command.timer.Service.Update: 20.083 sec]
[command.timer.Updater.updateSites: 2:55.528 sec]
[command.timer: 44.640 sec]
-
The application package can also be built and deployed in seperate steps.:
- Build the application and publish the release artifacts to the repository:
ad -p headlines -t AntBuilder -o headlines -c Build -- -buildstamp 200709040900
.
.
.
Batch request performed successfully.
Current count: 1
[command.timer.Builder.repoImport: 16.382 sec]
[command.timer: 37.230 sec]
- Reconfigure the headlines site in staging to use packages from the last build:
ad -p headlines -t WarUpdater -o headlines -c Change-Dependencies -- -version 200709040900
.
.
.
Request succeeded.
[command.timer.Updater.runChangeDependencies: 4.300 sec]
[command.timer: 8.764 sec]
- Deploy the release to the live site:
ad -p headlines -t WarUpdater -o headlines -c Update
.
.
.
[command.timer.Service.Start: 4.593 sec]
[command.timer.Service.Update: 22.917 sec]
[command.timer.Updater.updateSites: 2:38.813 sec]
[command.timer: 2:42.604 sec]
- Build the application and publish the release artifacts to the repository:
-
To check whether the Apache server is working properly or not, go to the following URL: http://localhost:8180/headlines/index.html
To check whether the Tomcat server is working properly or not, go to the following URL: http://localhost:8280/headlines/index.html
NoteIt is assumed that Headlines has been deployed to the local machine, hence "localhost". If this is not the case, use your machine's fully qualified domain name, or IP address instead of localhost.
The benefit of the standardized process is that an organization can use the same procedure and automation code to drive the release cycle in different environments. This reduces complexity from the operational process and facilitates transitioning involved multi-step procedures to less knowledgeable staff.
Next: See the getting around section for information about using the tools within the release management system.

