

Configure
Overview
This document describes how to configure a project to use this library.
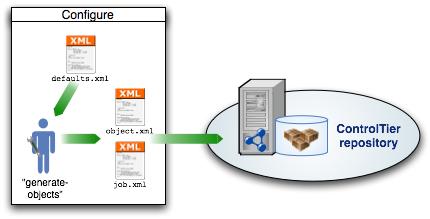
The diagram below illustrates the configuration is driven by a defaults.xml file. This file is used as input by a command generate-objects which in conjunction with template files, produces two output files: object.xml and job.xml.
Step #1: Edit defaults.xml
The defaults.xml file contains all the essential environment-specific information needed by the library. It answers questions like: What host has the master database schema? What host will the database export file be distributed? What are the username and passwords to access both schemas?
Open a text editor or better yet an XML editor. Cut and paste the contents of the XML shown below and save it to disk.
<defaults>
  <default>
    <node>${framework.node}</node>
    <!-- opts.name is passed in via the generate-objects command -->
    <name>${opts.name}</name>
  </default>
  <updater>
    <node>${defaults.default.node}</node>
    <databuilder>
      <node>${defaults.updater.node}</node>
      <rdb>
        <!-- host where master database schema resides -->
        <node>exporthost</node>
        <name>${opts.name}Source</name>
        <!-- database instance identifier -->
        <instancename>SID</instancename>
        <installroot>/path/to/rdb/home</installroot>
        <!-- database username -->
        <username>root</username>
        <!-- database password -->
        <password></password>
        <!-- module containing rdb-specific commands -->
        <strategy>RdbMysqlStrategy</strategy>
        <exportdir>/tmp/exportdir</exportdir>
        <config></config>
        <schema>
  	  <!-- schema name -->
          <name>contentDB</name>
	  <!-- schema username -->
          <username>schema_user</username>
	  <!-- schema password -->
          <password>schema_pass</password>
        </schema>
      </rdb>
    </databuilder>
    <site>
      <node>${defaults.updater.node}</node>
      <rdb>
        <!-- host where target database schema resides -->
        <node>${defaults.default.node}</node>
        <name>${opts.name}Target</name>
        <!-- database instance identifier -->
        <instancename>SID</instancename>
        <installroot>/path/to/rdb/home</installroot>
        <!-- database username -->
        <username>root</username>
        <!-- database password -->
        <password></password>
        <config></config>
        <schema>
  	  <!-- schema name -->
          <name>contentDB</name>
	  <!-- schema username -->
          <username>schema_user</username>
	  <!-- schema password -->
          <password>schema_pass</password>
	  <!-- Path to SQL script to run before import -->
          <preImportSqlScript>${entity.attribute.rdbSqlPackageInstallroot}/import/pre-import.sql</preImportSqlScript>
	  <!-- Path to SQL script to run after import -->
          <postImportSqlScript>${entity.attribute.rdbSqlPackageInstallroot}/import/post-import.sql</postImportSqlScript>
        </schema>
      </rdb>
    </site>
  </updater>
</defaults>
Some of the defaults can be taken as-is but the tags that are bold are ones that you must change, supplying the required local information.
Step #2: Configure library objects
Install and register an RdbProjectBuilder:
ad -p project -t RdbProjectBuilder -o name -c Install
ad -p project -t RdbProjectBuilder -o name -c Register -- \
      -basedir $CTIER_ROOT/src/project \
      -installroot $CTIER_ROOT/target/project
Copy the defaults.xml you created in Step #1 to $CTIER_ROOT/src/project/defaults.xml
Run the generate-objects command:
ad -p project -t RdbProjectBuilder -o name -c generate-objects -- \
      -name aName \
      -defaults $CTIER_ROOT/src/project/defaults.xml -load
Before you can run the job, it is necessary to deploy the objects. This is done via the AntDepo command, depot-setup. On the adminstrative node, run:
depot-setup -p project -a deploy
After this command successfully completes, a new set of objects will be loaded into the ControlTier repository. You can view them via RdbProjectBuilder's find-objects command:
ad -p project -t RdbProjectBuilder -o name -c find-objects -- \
      -name aName
Step #3: Upload job definition
The generate-objects command run in Step #2 will have produced a job.xml file. This file can be used to define a new job in the JobCenter application.
- Login to JobCenter (e.g, go to URL: http://localhost:9090/jobcenter/menu/index
- Press the "Create a new Job..." button
- Press the "Upload job.xml" button
- Locate and select the job.xml file output by generate-objects in the file chooser
- Press "Save" button
The new job will be listed on the home page of JobCenter
Optional Step: Check-in generated files
It is considered best practice to maintain the files generated by generate-objects in a source code repository.